Monday, 10 February 2014

We have a new website!

If you go to our website today www.redwyverngames.com, you'll see that we're sporting a brand new look/feel. We had some insightful (and justified) feedback on the old website and we also generally felt it was in need of a refresh. 

We're not a big company (it's just three of us) but that doesn't mean the website has to look quite so amateur. We hope that you'll agree it looks smarter and more professional and is (hopefully) easier to use!


Our new Homepage
The layout of the new pages
You may have also noticed that our blog looks a little different too. we've refreshed the look and feel here to bring it more inline with the website - keeping it consistent. we have done something similar with the forum too. 

Why now, you might ask! well, we're really proud of what we've achieved with Red Wyvern Games - we've had lots of really positive feedback on our games [check out this review of Seasons of War by Grand Scale Wargaming blog] and we're still really eager to keep making them and providing them to the wargames community. 

What we haven't been doing recently is be very accessible or responsive - which you can see from some feedback we had on Engage on the Wargame Vault page "And no one ever responded to my post on their forum, so you're on your own." - we don't want that and we never intended that to be the case! John K. please accept our apologies. 

As well as refreshing our website, this is where we make an effort to to be a part time company that acts like a full time professional company. responding to questions, emails and anything else and producing high quality games!

Thanks being so great so far! we appreciate all the time, effort and money you guys have directed our way.
Oh, and check out the new website! www.RedWyvernGames.com

Just to finish off. here's us at one of our Monday evening sessions. we're playtesting a lighthearted card game called 'RPG shop', and the sharp eyed amongst you might notice that it's being played on a sea board ;)


Seasons of War - Example Turn

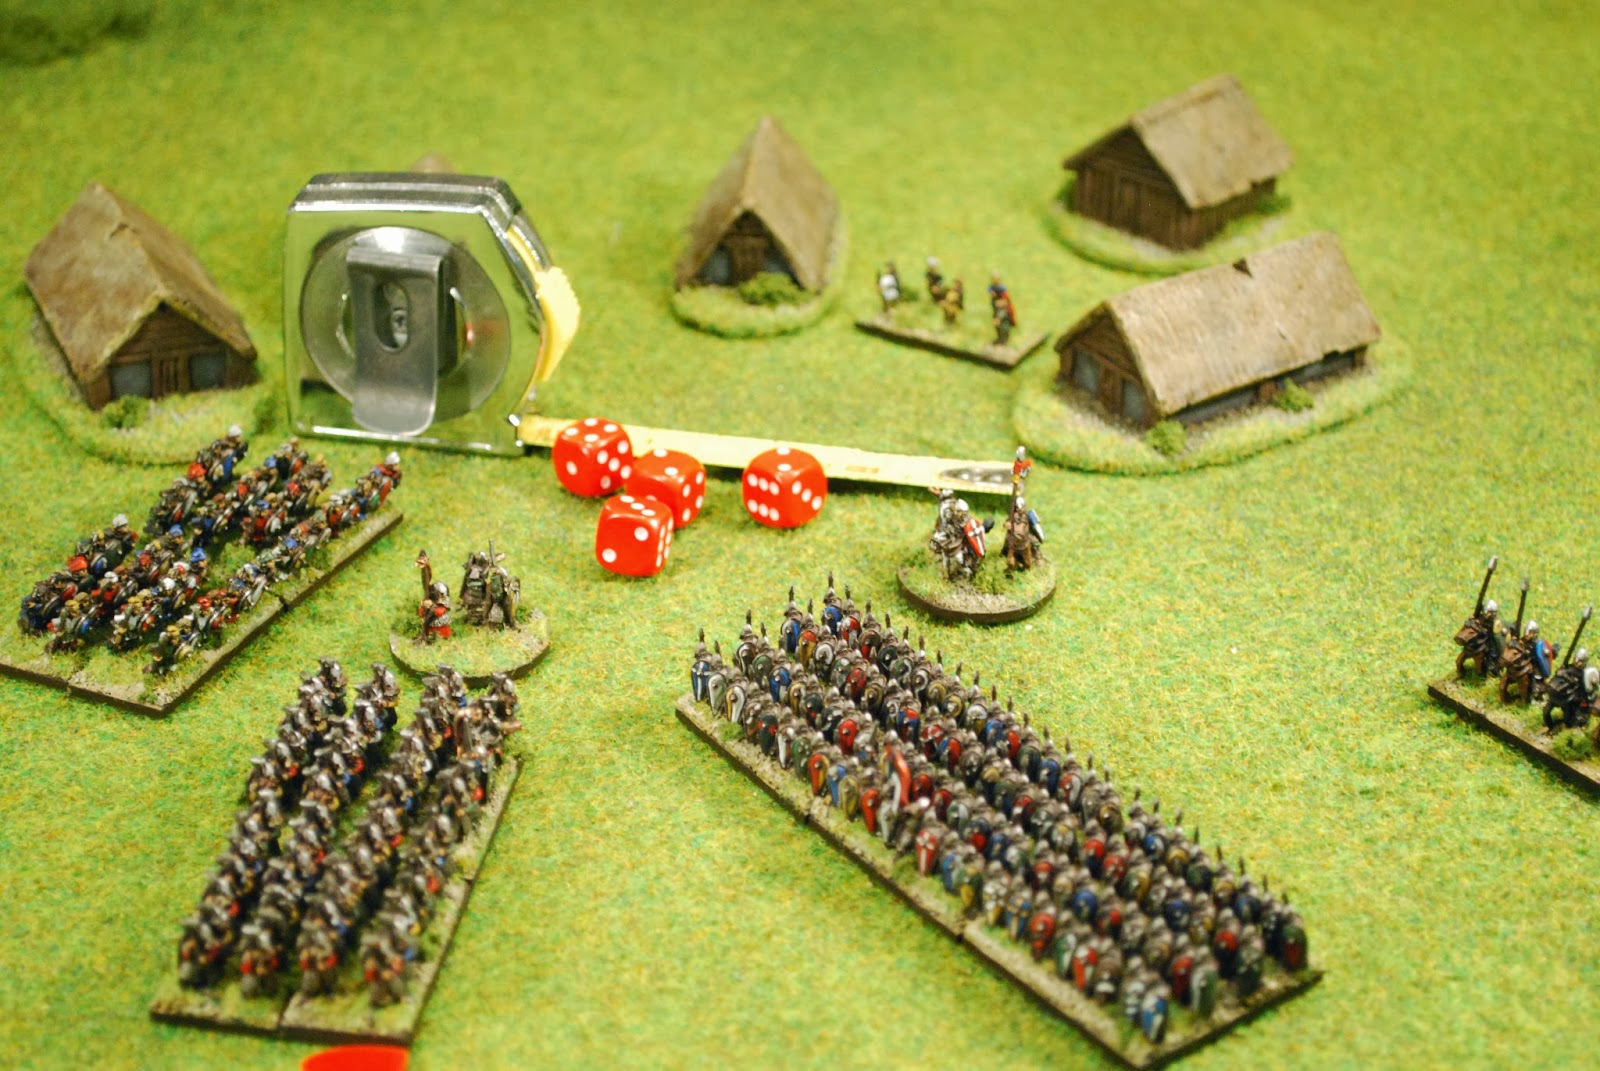
The aim of this article is to demonstrate how a turn of Seasons of War is: Days of the Conqueror is played. This example turn takes place during a pitched battle (rules for which can be found in the main rulebook) between Norman and Anglo Saxon forces listed below.

Normans
Noble
Norman Knights: 3 bases
Norman Archers: 2 bases

Anglo Saxons
Noble
Greater Fyrd: 4 bases
Housecarls: 4 bases

In Seasons of War, players take turns to activate and use all of their units before the turn goes to the other player (in other words: IGOUGO). In this example we will follow a single turn taken by the Norman forces.

Discipline and Action Phase


In the Discipline and Action Phase (D&A), all units in a player's force take part (the only exception to this is if they are engaged in a fight with an enemy unit as described later). When a player wishes to use a unit, a discipline roll is made; this determines how the unit performs in the turn. Even if a player does not want to move or act with a unit in the current turn, they must still take a discipline roll for the unit - there is still a chance the unit could perform a ‘Rash Action’ – which may cause the unit to perform an involuntary action.

The Norman player begins by activating his unit of knights on the left flank. The player rolls a single D10 as Norman Knights have a Discipline Type of D10. The result is compared to the chart below:

1: Rash Action
2-3: Simple Action
4+: Strategic or Simple Action

A 6 is rolled, meaning that the unit can perform either a simple or strategic action. The player chooses to charge the enemies Greater Fryd unit - a simple action.


Making the charge and using other units


The player must then work out if they meet the enemy in combat, or fall short. The charge bonus die (a D4) is rolled - this is added to the units normal move value. The player compares the unit’s total charge value of 10” (base 8" + 2" charge bonus) to the distance to the enemy unit - 9”. The enemy is in range, the knights charge is successful are the models moved into base contact.

Next, the Norman player chooses to activate their unit of Norman Archers. Archers have a discipline of D6, making them more likely to perform rash actions and less likely to be able to perform more complex actions. Fortunately, the player rolls a 3, allowing a single simple action to be performed. A shoot action allows the unit to make a half move and then shoot upon an enemy unit with missile weapons. 

Declaring the Anglo Saxon Housecarls as a target, the player measures the range and then rolls 2 attack dice (1D6 for each base as they are armed with bows).

Unlike some other games, there is no target roll to make in order to hit but any 1s are taken away. The player rolls a 3 and a 6. The scores are kept and the enemy now has a chance to negate the rolls by making an armour roll based on the armour dice found on the units profile - in the case of Housecarls, a D6. 

In order to stop damage from the arrows, the defending player must attempt to match up the armour dice with the opponents attack dice so that as many as possible equal or beat the attack dice scores. 


Rolling the defence dice


The Saxon player rolls his armour dice (one for each successful attack dice) and scores a 4 and a 3. In this case, the defender’s 3 is used to negate the attacking 3 but the 4 loses against the attacker’s 6. For each unbeaten attack dice, a single wound is caused to the defending unit. For every 2 wounds taken, a base is taken away. In the example above, a wound marker is placed with the unit to keep track of the ‘spare’ wound.

Each side is led by leader models depending on the size of the battle. In this instance, only a single Noble is used on each side as it is a relatively small battle, however, larger battles allow several Nobles and even a General model (representing the likes of Duke William or King Harold) to be taken.  Leader models may move freely up to 8” in any direction and may join units on their own side to aid them in the fight. Leader models do not need to roll a discipline test to activate. This turn, the player decides to move the leader model up and attach it to the unit of knights. This is done simply by moving the model into base contact with the unit.


The Fight Phase


Once all units in the army have been activated (or rolled for if the player does not wish them to do anything) the fight phase begins. In the fight phase, any units that have charged an enemy or are locked in combat have their chance to attack. Before any dice are rolled, the ‘fight strength’ of both sides is calculated. Fight strength takes into account the size and training of the unit as well as the advantage of charging. After the Fight Strength of each side has been calculated, they are compared. If the Fight Strength of both sides are equal, no side has a clear advantage and the fight continues as normal. If one side has a higher Fight Strength than the other side, they gain re-rolls equal to the difference. In the case of the unit of Norman knights against the Saxon Greater Fyrd, the scores would be calculated as follows:

Norman Knights:
Noble in the unit: +1
Cavalry unit charged: +2
Skilled unit: +2
Total: 5

Greater Fyrd:
Outnumber enemy unit: +1
Poor unit: +0
Total: 1

The Norman side has an advantage of 4 points, allowing the Norman player to allocate 4 rerolls between the attacking and defending phases (this must be decided before any dice are rolled). The Norman player decides to split his dice - putting two re-rolls to the attack phase and 2 re-rolls to the defence phase.

Although the attacks are assumed to be made simultaneously by both sides, it is convenient to work out each side separately. The Norman player rolls their attack dice first (1 for each base in contact and a bonus 1 for the Noble for a total of 4). As Norman Knights are cavalry, they receive a bonus to their dice on a turn they have charged in. This turn their attack type counts as D8 rather than D6. Attacking in the fight phase works in a similar way to when shooting. The scores are as follows: 1, 3, 4, 7. The Norman player decides to re-roll the score of 1 in hopes of getting a better score. Having a higher fight strength pays off and the rerolled die scores a 6.

The Greater Fyrd only have an armour value of d4, meaning that a 4 is the highest possible score. As the attacker has rolled a 6 and a 7 (both higher than 4) these attacks automatically cause damage and cannot be negated by rolling. Two D4s are rolled for the remaining attacks that can be defended against - netting a roll of a 1 and a 4. 

Just as in a shooting action, the armour dice are matched up to the attack dice. The 4 equals the attacking 4 but the 1 cannot negate any hits. In total 3 wounds have been caused meaning a single base and a single ‘spare’ wound have been caused. Before these are implemented however the Greater Fyrd have their chance to attack.


Attacking back and resolving combat


The Greater Fyrd have a total of 4 attack dice which are rolled using the unit’s attack type of D4. A 1, 3, 4 and 4 are rolled, just as in shooting any 1s are taken away leaving a 3, 4, 4. In response, the Norman Knights roll: 2, 5, and 8 on their D8 armour dice. The Norman player decides to re-roll the 2 and scores a 3.The Knights are able to match up all of the armour dice to negate all damage to the unit.

After all damage has been worked out, and all units have had a chance to attack, a Morale test is rolled by any unit on the losing side (the side that has taken the most damage). In the event of a draw no roll is made. The Saxon player rolls a die matching the morale type of the unit, in this case a D4, and subtracts the number that the unit lost by (3). Rolling a 3, the resulting score comes out as a 0 (3-3=0). This causes the unit to break and flee. 

The unit immediately moves a distance of 4" + D4” directly away from the enemy. A retreat token is also put next to the fleeing unit. The Norman player may next choose to give chase or attempt to give chase. In this case, the player wants to hold the unit back in order to face down the Housecarls in the following turns and successfully passes a discipline roll for restraint.

After the fight phase, the turn is over. The Saxon player may now act with their units. They will need to decide how to react with their Housecarls and Noble and attempt to rally the fleeing Greater Fyrd in the face of the mighty Normans. 

Wednesday, 23 October 2013

Seasons of War: Core List

A new release for Seasons of War fans!

At many of the shows we have attended, people have responded positively to demo games of Seasons of War: Days of the Conqueror and have seen the potential of using armies in their collections to play games beyond those described in the book. The purpose of this 'Core Army List' is to allow players to represent most if not any pre-powder historical faction and even a fantasy army in a game of Seasons of War, by providing generic troop choices that can be tailored to suit a specific unit's arms and armaments.

To allow customisation, many unit types have 'Special Equipment Options'. This simply lists any additional Special Equipment the unit can take. Most of the rules for the Special Equipment options can be found in the main rulebook: Seasons of War: Days of the Conqueror. We have however added additional items and relevant rules in this supplement such as heavy armour, pikes and ranged warmachines.


We hope this Core Army List will provide an immediate means to allow all you gamers to play Seasons with any your armies, whilst we beaver away at providing more tailored and specific army lists such as Republican Romans or Germanic Tribes. Think of it as our very own Ravening Hordes. 

This supplement is available to download, for free, from the Seasons of War Resources page.

The main rulebook is available to buy as a PDF at Wargame Vault ($10 about £6.50) or as a hard copy from our website (£10 + p&p).

Monday, 21 October 2013

Fleet Lists now available to download

Hi All,

Quick update, we've uploaded the fleet lists for the Federal Union and the Kurgon Empire to the website. They're on the Engage Resources page here

They're 'print friendly' PDF's so you cna download, print out and use them for quick play games.

Enjoy!

Craig.

Monday, 14 October 2013

More Sci Crime pictures

Ian finished painting and basing his individual characters and crowds over the weekend, so we've got a few more pictures of fully painted Sci Crime miniatures to share with you, finished off with some terrain done by Ben!


A couple of crowds, perfect for hiding in, but also getting in your way.


Ian's individual characters.. wall-e has turned his hand to new skills
A fenced off storage yard, a perfect place for dodgy dealings and negotiations

Thursday, 10 October 2013

An inquiry by the Ministry of Internal Affairs has reported a 30% rise in Human on Cyborg crime...

From the grim darkness of the far future... wait no, that's not right..
From the grim darkness of Ben's office desk comes some sneak peaks of the other games we have in progress, one i'm particularly looking forward to: Sci Crime..


A mission led 15mm game that see's you play the part of a detective in a future world, with a good mix of on board and off board action you must gather evidence, arrest perps, protect witnesses and build a case to bring down crime lords and killers whilst making sure that the stress of the case doesn't drive you to drink or send you off the rails.

We've been busy ourselves painting up our characters and the civilians that will hide those you're aiming to arrest and gather around crime scenes getting in your way..


'The Colonel'
Crowds of civilians and bystanders


We're excited about this game and the completely different direction it takes from our other games has invigorated us over here. we'll hopefully have more news and insights soon.

over and out,
Craig.

P.s. coming soon

New fleets lists and a campaign for Engage and a 'generic' army list for Seasons of War that will enable you to play using armies from most ages right up to the start of the black powder era whilst we work on individual army lists.

Wednesday, 25 September 2013

Battle Report - Engage: Spaceship Combat

So finally a bit of free time from 'real life', we took the chance to have a game of Engage and record it for a battle report. Before you get started, i must apologise for the quality of the photos. 

Ben and I agreed to a 1000pt game, which sits in at around the large end of a medium sized game and should last about 1-1.5 hours. The notes and write up have been done by Ian who also undertook the role of our impartial adjudicator.

We used the Basic fleet list, as found in the rule book  to provide us with the basic stats and points for our ships, then used the extended upgrade list, also found in the rule book, to upgrade them with additional weapons.

Click the following link to find out more about  Engage: Spaceship Combat.


The Fleets


Ben’s Fleet

Destroyer [200], “BSS Shotgun”
Remove Energy Torpedo 
Swap Beams for Drain Beams 
Command Crew 1 

Light Cruiser [445], “BSS Longbow” 
Remove Energy Torpedo for +2 Beam Power
Swap Beams for Lancer Beams
Increase Impulse Engines by +1 
Add Stealth System Power 2 

Frigate [170], “BSS Alpha”
Add Energy Torpedo 

Frigate [170], “BSS Beta” 
Add Energy Torpedo

Fleet Total 985pts 

The plan
My strategy is arguably a risky one. Using the ‘BSS Shotgun’, I hope to deliver a suicidal sucker punch to Craig’s most threatening ship by crippling its shields. To do this, I plan on moving auxiliary power into my ship’s drain beams (allowing me to roll a whopping 9 damage dice and doubling any damage caused to the target’s shields). Although this early move won’t cause any hull damage (drain beams can only ever damage the shields), I hope to leave the target ship vulnerable to the rest of my fleet.  

The BSS Longbow boasts some impressive long ranged firepower thanks to its lancer beams, which should enable it to take full advantage of the BSS Shotgun’s initial manoeuvre from a safe distance. Lancer beams don’t lose power of distance like other beam weapons. There is of course still the matter of hitting so boosting sensor arrays with auxiliary power might be a good move as this makes it easier to hit enemy ships when firing.

The BSS Alpha and BSS Beta make perfect utility ships. Although they possess very few upgrades, the energy torpedoes they possess allow them to lay down some decent firepower and present a reasonable threat that larger ships will not want to ignore. I intend to use them to apply pressure to Craig’s flanks and rear, hopefully drawing some attention away from the BSS Longbow in the process!


Craig’s Fleet

Light Cruiser - "CL Constantinople"
Beam Weapons
Quantum Torpedoes
Ablative Armour
2 Command Points

Light Cruiser - "CL Say My Name"
Beam Weapons
Photon Torpedoes
1 Command Point

Destroyer - "DD Agincourt"
Beam Weapons
Photon Torpedoes

Fleet Total 1010pts

The plan
I have decided to go for a smaller number of ships in my fleet but each has been given several upgrades, hopefully increasing their overall threat level. I plant to use the Agincourt and Constantinople working in tandem, combining their firepower against a single enemy at a time. Whilst this team chips away at the enemy, ‘Say my name’ will work solo to hold the far flank.

The ablative armour I’ve given the Constantinople should help protect it from Ben as I’m certain he’ll want to take it down when he finds out it is packing Quantum Torpedoes. Like Photon Torpedoes, Quantum Torpedoes double the score of any damage dice but have the added advantage of rolling a mighty 4 dice instead of the usual 2. This should allow me to punch through even the toughest shield.


The battle


Ben and Craig decided to use the rules for a pitched battle. This type of battle is straight fight with no specific objective other than inflicting damage and protecting your own fleet. The 2 commanders began by placing down some space terrain (basic asteroids) and then alternately deploying their ships. Once the battlefield was ready Ben and Craig rolled for the initiative (the chance to activate a ship of their choice)

Craig won the initiative roll – 6 to 3 (the roll is made at the start of every turn on a d6). Craig elected to activate one of Ben’s ships first: the BSS Longbow. Activating an enemy ship may seem unusual but it can force them to show their hand and make the first move.


Turn 1
With the BSS Longbow now activated, Ben elected to move 2 auxiliary power into the ship’s forward shields. This means that the shield power of the front shield counts as 4 more when the ship is attacked in its front arc (2 for each point of power). After a tentative impulse move, Ben attempted a long shot from a whopping 64” (-5 to hit) against ‘Say My Name’ using lancer beams. Unfortunately, a double 1meant a miss. Having completed the ship’s maximum 3 actions, it passes to Craig to activate one of his own ships.

The Constantinople is Craig’s ship of choice. Like Ben, Craig begins the battle defensively, impulse moving forward, and diverting 2 power to the Constantinople’s forward shields and takes a pot shot at the BSS Longbow. Ben reveals that his ship is running a stealth system which doubles the range of attacks against it for the purpose of rolling to hit. With the range modifiers this would mean Craig would need to roll an 18 on 2 dice, an impossible task, the shot is wasted.

It is again Ben’s chance to activate a ship, he chooses  the BSS Alpha and extends his defensive streak, powering up the shields.

The turn continues in much the same with both commanders preparing their ships for combat. The BSS Shotgun however, breaks the mould and warps 3 (36”) towards Craig’s battle line. The Shotgun then shoots its drain beams, targeting ‘Say My Name’. Ben rolls to hit, beating the required 8. The BSS Shotgun’s drain beams were at power 6, meaning Ben rolled a total of 6 dice to determine what if any damage was caused. A single 6 was rolled, causing 2 damage to the shields (drain beams double shield damage). To finish the turn, Ben transferred 3 power into his ship’s main shields.


Turn 2
At the start of turn 2, Ben won the initiative roll and elected to activate the BSS Shotgun again. Having previously moved 3 energy into shields just in case he lost the priority roll, he then moved all 3 into the beam weapons and once again opened fire upon ‘Say My Name’. With a successful hit he then rolled 9 dice for damage (the extra three coming from the auxiliary power) a further 2 points of shield damage was caused. Ben attempted to carry out a ‘fire again’ order and succeeded his command roll. Fortunately for Craig, the shots missed.

It was now the Craig’s chance to act, choosing ‘Say My Name’. With the ship in a vulnerable position, Craig attempted to repair the shield damage. Unfortunately the roll of a 4+ failed. To compound his misery, Craig missed with the ship’s beam weapons. He does however manage to hit the BSS Shotgun with photon torpedoes and causes 2 points of damage to the ship’s hull. Like Ben, Craig attempted a fire again order which he succeeded in passing but missed with his shooting, wasting a command point.

Keeping the BSS Longbow at a safe distance, Ben attempts to deal further damage to ‘Say My Name’ but fails to hit with any weapons.

The Constantinople made an impulse forward, moved 1 energy to sensors and opened fire at the BSS Shotgun, hitting and causing 3 hull damage and a point of damage to the shields.

No further damage is caused this turn, and all ships move into a more advantageous firing position.

Turn 3
With Craig winning the initiative, ‘Say My Name’ successfully repairs 2 shield damage with Craig rolling a lucky a 6. His luck ends there however and both beam weapons and photon torpedoes miss the BSS Shotgun.


The BSS Shotgun, fired its drain beams against ‘Say My Name’, hitting and with Ben rolling 2 6s, causing 4 shield damage. With the total shield damage over the ship’s original shield value, the shields go offline and any auxiliary power is lost. Ben then attempted to repair his ship’s warp engines but failed and so moved 2 power into the ship’s impulse engines, meaning it will be harder to hit.

Craig’s ship, the Constantinople makes an impulse move towards the BSS Shotgun, opening fire with both beams and quantum torpedoes but unfortunately misses both attempts.

‘Say My Name’ is dealt a deathblow when Beta, moves 1 power to sensors and fires with beam weapons. The ship finds it mark, with no shields to beat, any damage caused is doubled, an impressive 8 damage points are scored and the ship is destroyed.

The Agincourt finally gets into the battle and warps into the rear arc of the BSS Shotgun, targeting it with beam weapons and destroying it (targeting a ship in the rear arc makes it easier to hit, adding 2 to the shooting dice). For its final action, the ship fires it’s torpedoes at the BSS Alpha but misses.


With no ships remaining, Ben uses both his remaining ships (Longbow and Alpha), firing upon the Agincourt, shutting down its shields and causing a point of hull damage between them.

Turn 4
Craig once again wins the initiative. The Agincourt, fails to repair its shields but caused a point of shield damage to the BSS Alpha with its beam weapons. In retaliation, the BSS Alpha, impulse moves closer to the Agincourt, and destroys it with its beam weapons.

With only the Constantinople remaining, Craig decides to go after the BSS Longbow, warping 3 towards it but missing with its torpedoes and beams alike. Taking advantage of being able to target the Constantinople’s rear, the BSS Beta fires torpedoes which cause a point of shield damage; a point of hull damage being saved by the ship’s ablative armour. The Beta follows up its success by firing its beam weapons, causing a further point of shield damage and a point of hull damage.


The BSS Longbow misses with its beam weapons and warps away from danger and then makes a docking move to keep its rear out of sight of the Constantinople.

Turn 5 and 6
In the closing stages of the battle, the Constantinople is able to destroy the BSS Alpha with an impressive display of rolling but succumbs to the combined might of the BSS Longbow’s lancer beams and the BSS Beta’s torpedoes. With Craig’s fleet wiped out, Ben is the victor.


Results
Total time: 1hr 15mins
Craig was able to take out 370 points of Ben’s fleet.
Ben took out Craig’s entire fleet; a total of 1010 points.

As a result of this, Ben won a ‘dominating victory’!

If this battle was part of a campaign using the Engage Campaign System, Ben would have earned himself 3 intel and 3 resources points. In future battles, Ben could use these to make flanking manoeuvres and redeploy his ships to give him an edge as well as gain additional points to improve his ships.


Craig's Conclusion
I honestly had no idea of what to expect from Ben's fleet, but i was surprised by the ingenious decision to combine the Shotgun and the Longbow in such a way.

The battle didn't start great for me, with lots of missed shots causing me to ultimately lose CL Say My Name so early on, my battle plan slipped. However my biggest mistake was my fit of rage after I lost the DD Agincourt - jumping the CL Constantinople all the way down the board to take on the BSS Longbow was a terrible idea, compounded by missing all shots at the BSS Longbow and ultimately exposing my rear to BSS Alpha and BSS Beta. At the least, I could have remembered to use my last command point to do a P’Kard manoeuvre so that I still got points for my sensor array when shooting... I might have hit him then.

Really though, I should have played a tactical game for the victory points and used my superior ship to take out Ben’s two smaller frigates before moving on to the Longbow. With her long range weapon the only one she had and my heavy shields coupled with ablative armour, it would have taken a while for me Ben to do me damage whilst I took out his two frigates; Alpha and Beta.

A lesson learned. I think my fleet composition was generally on the right lines, I just let myself down with its execution. Well played Mr Ben!

Ben's Conclusion
Mwahaha! That went medium-suprisingly well, a lot of the time due to Craig's poor dice rolling.
The BSS Shotgun had some success, but I hadn't counted on losing it so quickly - and would've loved to have it around for a few more turns to help soften up Craig's fleet some more.

The BSS Longbow had some great luck with it's Lancer Beams and Stealth System combo, but boy did I find myself wishing for a torpedo weapon when Craig warp moved right in to my face!

Ship of the match for me has to go to BSS Beta, one of my Frigates. He did some serious damage; fighting way above his weight! Once Shotgun had been destroyed I thought I was in trouble but this little ship stepped up to the plate and then some.
The crew of that ship are getting some serious leave time and a few promotions!

All in all I think I got lucky and Craig made a few decisions that worked out well for me in the long run. A great game and I can't wait to play him again!


Again, for more info, follow this link, to go to our website, or this link, for our wargame vault page.